Bacteria
Prokaryotes are organisms that are believed to have be the first inhabitants on earth. The main difference between prokaryotes and eukaryotes is that prokaryotes do not have a membrane-bound nucleus; it has a nucleoid and naked DNA in the cytoplasm. Another characteristic that is initially perceived to be similar is the presence of a cell wall – the cell walls in eukaryotes are made up of chitin and cellulose, however the component that makes up prokaryotic cell walls is peptidoglycan. Prokaryotes are unicellular and they perform all basic functions of life: movement, respiration, growth, etc.
In the lab we explored members of the Kingdom Bacteria. These cells are microscopic and usually measured as less than a micrometer in diamter. These same bacteria contain a cell wall providing them with three distinct characteristic shapes:
Bacillus (rod-shaped)
Coccus (spherical)
Spirillium (spiral)
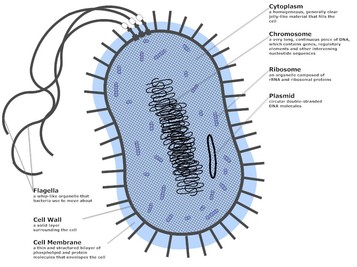
Important structures of Bacteria:
Capsule - a layer of protein which can also be a slime layer in other bacteria, is used primarily for adherence to their substrate and even to protect the cell from dehydration (Campbell et. al. pp. 558).
Fimbriae - a structure used to stick to substrate (pp. 558).
Pili - AKA sex pili, are used to join to cells together following DNA transfer (pp. 558).
Flagella - the mechanism that promotes movement, which is not covered by the membrane and is much smaller compared to eukaryotic flagella (pp. 558).
Plasmids - independent rings that promote DNA replication (pp. 560)
Nucleoid - a bundle of chromosomes that are fee-living in the cytoplasm.
How do prokaryotes reproduce and adapt?
Prokaryotes reproduce via binary fission, which creates 2 identical daughter cells through asexual reproduction. Prokaryotes are very efficient because they can reproduce in high numbers very fast until they exhaust their nutrient supplies. However, they have still developed a component that ensures their survival - the endospore. They are defense mechanisms that promote the preservation of the cell by making copies of its chromosomes and keeping it in the endospore until the environment improves. These structures can live for a long period of time and is a beneficial adaptation to have.
Transfer of genes in prokaryotes:
Transformation - the environment affects the genotype and phenotype of the prokaryote due to the cells extraction of DNA from its surroundings.
Transduction - this involves genetic recombination through bacteriophages (phages) - viruses that inject themselves into a bacteria. The hosts geners are fragemented and the T4 virus injects its genetic information into the bacteria (Microbial Genetics: Gene Transfer).
Conjugation - this is how bacteria reproduce overall.
The bacteria that we are observing are heterotrophic bacteria because they feed on dead organic materials. Also, some of the bacteria are pathogenic as they can cause disease such as stomach sickness.
In the lab we explored members of the Kingdom Bacteria. These cells are microscopic and usually measured as less than a micrometer in diamter. These same bacteria contain a cell wall providing them with three distinct characteristic shapes:
Bacillus (rod-shaped)
Coccus (spherical)
Spirillium (spiral)
Important structures of Bacteria:
Capsule - a layer of protein which can also be a slime layer in other bacteria, is used primarily for adherence to their substrate and even to protect the cell from dehydration (Campbell et. al. pp. 558).
Fimbriae - a structure used to stick to substrate (pp. 558).
Pili - AKA sex pili, are used to join to cells together following DNA transfer (pp. 558).
Flagella - the mechanism that promotes movement, which is not covered by the membrane and is much smaller compared to eukaryotic flagella (pp. 558).
Plasmids - independent rings that promote DNA replication (pp. 560)
Nucleoid - a bundle of chromosomes that are fee-living in the cytoplasm.
How do prokaryotes reproduce and adapt?
Prokaryotes reproduce via binary fission, which creates 2 identical daughter cells through asexual reproduction. Prokaryotes are very efficient because they can reproduce in high numbers very fast until they exhaust their nutrient supplies. However, they have still developed a component that ensures their survival - the endospore. They are defense mechanisms that promote the preservation of the cell by making copies of its chromosomes and keeping it in the endospore until the environment improves. These structures can live for a long period of time and is a beneficial adaptation to have.
Transfer of genes in prokaryotes:
Transformation - the environment affects the genotype and phenotype of the prokaryote due to the cells extraction of DNA from its surroundings.
Transduction - this involves genetic recombination through bacteriophages (phages) - viruses that inject themselves into a bacteria. The hosts geners are fragemented and the T4 virus injects its genetic information into the bacteria (Microbial Genetics: Gene Transfer).
Conjugation - this is how bacteria reproduce overall.
The bacteria that we are observing are heterotrophic bacteria because they feed on dead organic materials. Also, some of the bacteria are pathogenic as they can cause disease such as stomach sickness.
Aseptic Technique
Aseptic Techniques are the measures taken to limit the exposure of the student and the environment to the bacteria. Also, it prevents the contamination of the bacterial culture by unwanted organisms that can and will distort our findings.
Culture Common Bacteria Using Aseptic technique
1. Obtain a sterile cotton swab and a closed Petri dish containing sterile
nutrient agar.
2. Open the package swab and drag the tip over a surface such as your face, fingernails, or tabletop or ANYWHERE .
For Lab Report - Hypothesize
on the number of colonies of bacteria to expect to grow based on the
structure/surface swabbed(minimal, average, and maximal colony growth)
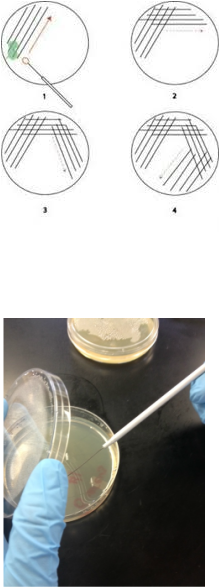
3. Open the Petri dish and drag the
exposed swab over the surface of the agar in the manner demonstrated in Figure
Three.
4. Close the lid and tape it shut.
Label the dish with a wax pencil or sharpie pen and place the dish in an
incubator or in a warm area.
5. After 24-48 hours examine the agar for bacterial growth. Describe your
bacteria colonies in terms of the form, margin, color, and elevation. State the
number of colonies you observed based on differences seen in morphological
characteristics and state if your hypothesis on the structure/surfaces that was
swabbed was indeed expected
Culture Common Bacteria Using Aseptic technique
1. Obtain a sterile cotton swab and a closed Petri dish containing sterile
nutrient agar.
2. Open the package swab and drag the tip over a surface such as your face, fingernails, or tabletop or ANYWHERE .
For Lab Report - Hypothesize
on the number of colonies of bacteria to expect to grow based on the
structure/surface swabbed(minimal, average, and maximal colony growth)
3. Open the Petri dish and drag the
exposed swab over the surface of the agar in the manner demonstrated in Figure
Three.
4. Close the lid and tape it shut.
Label the dish with a wax pencil or sharpie pen and place the dish in an
incubator or in a warm area.
5. After 24-48 hours examine the agar for bacterial growth. Describe your
bacteria colonies in terms of the form, margin, color, and elevation. State the
number of colonies you observed based on differences seen in morphological
characteristics and state if your hypothesis on the structure/surfaces that was
swabbed was indeed expected
Gram Staining Technique

Gram Staining is a technique based on the different structural and chemical composition of bacterial cell walls. This process is important because it can show the correlation between the sensitivity of bacterium to antibiotics. By using this technique we were able to see which bacteria were gram positive (cell wall with large amounts of peptidoglycan and retain dye) and gram negative bacteria (are more complex containing lipocarbhydrates and that do not retain dye).
Materials
- Inoculating loop
- 3 x 600mL beakers
- Staining Tray
- Clean slides
- Clothes peg or similar implement
- Deionized water
- Ethanol in a squirt-bottle
- Safronin-O stain
- Crystal Violet Stain
- Gram’s Iodine solution
- Bunsen Burner
- Bibulous paper
2 unknown samples of bacteria
(unknown for gram stain category)
Fixing the smear – broth culture
1. Some may find it useful to draw a
circle in the center of the slide to mark a ‘target’ for the smear. In this
case, use a wax pencil or sharpie marker and be sure to mark the slide on the
opposite side from the smear itself. This step is optional.
2. Using proper aseptic technique,
remove 2 loop fulls of organisms from the tube and deposit them in the center of
a clean slide. Remember to sterilize the loop between the 2 transfers as your
slide is not sterile and will otherwise contaminate your loop and consequently
your culture.
3. If the culture is heavy (the blob of
liquid on the slide looks very cloudy), add deionized water until an appropriate
dilution is obtained. It is very common for students to transfer too much
bacteria, which makes it difficult to distinguish individual bacteria or
bacterial colonies under the microscope.
4. Using tongs (a clothes-peg works
well) to hold the slide, pass it through the blue flame of a Bunsen burner to
gently warm the slide. Do not hold the slide in the flame as this will burn the
sample and potentially crack the slide. This step is called ‘fixing’ and its
purpose is two-fold; it kills the bacteria and it attaches them to the slide so
that they are less likely to wash off in future steps.
Fixing the smear – Plate or slant culture
5. Draw a target if desired, as
described above.
6. Using your inoculating loop,
transfer 2 loop fulls of deionized water to the center of the slide, and then
using proper aseptic technique transfer a small amount of bacteria from the
plate or slant onto the slide and mix into the water. If your smear is too
‘heavy’, add more water to dilute it or use an inoculating needle in place of
the loop.
7. Fix the smear as described above.
Staining the smear
8. Fill 3 beakers with tap water,
arrange your slides on the staining tray and make sure you have all the
materials and stains that you will need. The following steps are time-sensitive.
9. Cover your smear (or smears if
you are doing more than one at once) with crystal violet stain and allow it to sit
for about 1 minute.
10. Tip excess stain into the staining
tray and rinse your slide by immersing it into each of the 3 beakers in turn and
gently moving it back and forth.
11. Cover the stain with Gram’s Iodine
solution and allow it to stand for approximately 1 minute. While you are
waiting, empty the beakers and re-fill them with clean water. The iodine
solution fixes the crystal violet inside the cell walls of the bacteria.
12. Pour and then rinse off the iodine
solution in the same way as you did the crystal violet.
13. Holding the slide with the tongs,
take the ethanol in the squirt bottle and very gently run ethanol over the slide
and into the staining tray. Continue doing this until the ethanol running off
the slide is colourless. This step is called decolourisation. The ethanol rinses
away the outer lipopolysaccharide membrane of gram-negative bacteria along with
the crystal violet – iodine complex from the now-exposed peptidoglycan layer
beneath.
14. Counterstain by covering the smear
with safranin-o solution and let it stand for about 30 seconds. In the meantime,
change the water in the beakers.
15. Pour off and then rinse the
safranin-o from the slide in the same way as before.
16. Drain and then very carefully blot dry the slide using bibolous paper. Do
not rub the slide as this will rub off your bacteria.
17. Examine the slide under oil-immersion.
Sources
Microbial genetics: Gene transfer. (n.d.). Retrieved from http://plato.acadiau.ca/courses/biol/Microbiology/transfer.htm
